Thursday, February 16, 2012

Menghapus Recycler Secara Paten

Cara Menghapus Folder AUTORUN.INF dan RECYCLER

Akhir akhir ini kita sering menemui folder aneh yang berupa folder autorun.inf dan recycler bahkan dari pengalaman saya sendiri semua computer yang saya temui memiliki folder ini entah itu punya teman,warnet,keluarga,…dll yang anehnya lagi filenya mempunyai icon yang sama dengan recycler bin (tempat sampah) yang ada di windows.
Awalnya saya mengira ini adalah folder system dari Windows karena folder ini tidak bisa dihapus dan dihidden oleh system,Tapi setelah saya melakukan browsing di internet saya menemukan bahwa folder ini diciptakan oleh virus untuk menyembunyikan diri dari kejaran warga (Maling kale…………..)dan untungnya saya menemukan cara menghapusnya di salah satu forum online yang membahas tentang computer,thanks for all………..n gini caranya :

Perhatikan folder autorun.inf


Buka Command Prompt : Klik Run dan ketik cmd
Pada kota cmd ketik RD /S /Q \\.\ Nama Drive\Nama folder
Disini saya mengetik RD /S /Q \\.\E:\autorun.inf


Lihat folder autorun.in sudah hilang……..cara diatas juga digunakan untuk menghapus folder recycler,anda tinggal merubah nama foldernya menjadi recycler seperti :
RD /S /Q \\.\E:\RECYCLER


sumber http://www.khavid.com/2011/07/cara-menghapus-folder-autoruninf-dan.html

Wednesday, February 15, 2012

Teknik Pewarnaan Tingkat Dasar Dengan Photo Shop


Do The Basic Coloring


As explained above, blending mode Multiply, only affects white areas, while the black outlines stay intact. Now we’ll create a new layer and do the coloring on it.

The first step can be summarized like this. Below, we have the raw material aforementioned.


Then, let’s start to pour these colors (see figure below). All are on Multiply blending mode, with opacity at 100%.


[please click on the image to see larger picture and additional details]


Step 2: Adding Shadows


Now, we need to apply shadows. In this project, I intended the lightsource to be on the right, and a little to the front. So we’ll have to draw shadows on the left part (also remember the body’s 3D contour).

The color we choose here is black, with blending mode Soft Light. The opacity is set to 71%, respectively.


[please click on the image to see larger picture and additional details]


Step 3: Adding Lights


The shades are done. Now, we need to apply lights.

Because the light source is (supposedly) on the right part, we need to emphasize the lighting there. Don’t forget to consider the body’s 3D contour when doing this step.

The color is set to white, blending mode at Soft Light, and opacity at 59%.

Note: Black background is applied below only to distinguish with the white color to be applied. Don’t go with that BG in actual coloring. (~_^)


[please click on the image to see larger picture and additional details]


Step 4: Adding More Shades


We’ll try to apply additional shades. This is done to give more feeling-of-depth to the image.

The color is black again; blending mode at Soft Light. The opacity is at 25%. This value is set on purpose — we don’t want it to overly influence the primary shades, which were done at step (2).


[please click on the image to see larger picture and additional details]


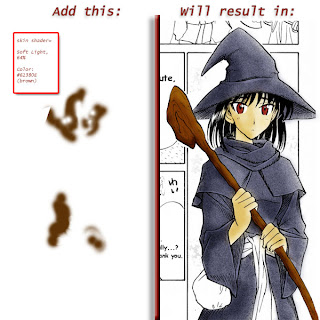
Step 5: Adding a Skin Tone


As in photography, human skin becomes more lively when it has a brown-to-reddish tone on it. So, in this step, we’ll add some brownish tone to the character’s skin.

NB: I chose brown here because I imagined a somewhat-dim lightsource. If you like to imagine bright, white lightsource (e.g. 12 PM sunlight), you may want to use pale red or low-opacity pink.

The color used here is brown, with hexa #61380E. Blending mode set to Soft Light, and opacity at 64%.


[please click on the image to see larger picture and additional details]


And so…


Now our coloring project is done. The final result is as shown above, as the step (5) has been accomplished.

For the sake of comparison, below I have created an image which shows the ‘before’ and ‘after’ picture. The ‘before’ is on the left — while the ‘after’ is on the right side, respectively.


[please click on the image to see larger picture and additional details]


Hmm, is it a far difference or not? Quite a feat in five steps, I guess. ;)

***

And, well… that’s it for this PS tutorial session in this weblog; it also concludes our tutorial session this time. Hope you like it. ;)

See you again, and good-bye — until the end of April, perhaps. It should be time for this month’s session, though. :)


source http://sora9n.wordpress.com/2007/04/05/photoshop-tutorial-simple-way-for-coloring-m/

Related Links

Labels

COMPUTER TECH (39) BLOGGING (25) NEWS (25) photoshop (24) telebit (15) INTERNET BUSINESS (10) desain grafis (5) otomotif (4) CELLULAR (3) ENTERTAINMENT (3) coreldraw (3) digital cameras (3) ipad wifi + 3g apple (3) ramnit (3) recycler (3) OUR PRODUCT (2) PRIVAT MURAH (2) bandung (2) core i7 (2) corel (2) internet tv (2) kuliner (2) pc tablet (2) seo (2) DLL (1) HAPE BANDUNG (1) Nokia 808 PureView (1) Pentax Optio WG-1 (1) SCIENCE (1) VOCER (1) alif (1) amazon (1) anak-anak (1) android (1) aneh (1) bandung kaligrafi (1) bandung raya (1) barack obama (1) blogbuzz (1) buah-buahan (1) bugar (1) buy online (1) cara meningkatkan trafik dengan mudah (1) convert to pdf (1) delicious food (1) design grafis (1) design graphis (1) façons d'augmenter les visiteurs du blog de la circulation (1) google sandbox (1) graphic desain (1) hacker (1) honda suzuki (1) hotel bandung (1) hp (1) icrease traffic (1) iklan gratis tanpa daftar (1) jokowi dan banjir (1) jujur (1) kaligrafi (1) kaligrafi modern (1) kopling (1) koruptor (1) lepas kunci (1) like fan page (1) like this (1) lubang terbesar di bumi (1) lukisan bagus (1) make money (1) mid (1) modi per aumentare i visitatori del blog di traffico (1) monetize (1) motor (1) motor bebek (1) nasi goreng (1) notebook (1) online and dollar (1) pakai supir (1) parenting (1) paypal (1) pejabat korup (1) per kolpling (1) ping script (1) plesetan (1) ptc (1) rental mobil murah (1) rental mpbil bandung (1) sality (1) sayuran (1) security for wireless (1) seeking for job (1) sehat (1) sms banking bri (1) sms gratis (1) spongebob (1) survey dapet duit (1) traffict (1) twitter icon animasi burung terbang (1) umur panjang (1) vcd to mp3 (1) velocity micro t301 (1) virus (1) widget (1) yamaha (1)

Bisnis Jabar